Introduction to LLPL
There are several ways to program with persistent memory from Java. A recent pmem.io blog article described the pmemkv library, a persistent key-value store, which can be used from multiple languages. For Java, pmemkv supports three ubiquitous Java types: String, byte[], and ByteBuffer.
Another PMDK component, the Low-Level Persistence Library (LLPL) is an open source Java library (https://github.com/pmem/llpl) that gives Java developers access to persistent memory in a very fast and flexible way. This article will introduce LLPL by way of Java examples that show how to manage and access persistent memory using the library.
LLPL offers persistent memory as heaps of memory, separate from the Java heap and the Java objects that reside there. While LLPL heaps are separate from the (non-persistent) Java heap, you use regular Java objects to access persistent memory. You can create LLPL heaps, reopen them, and delete them. You can create many heaps, of almost any size, as long as there is unused persistent memory available to create them.
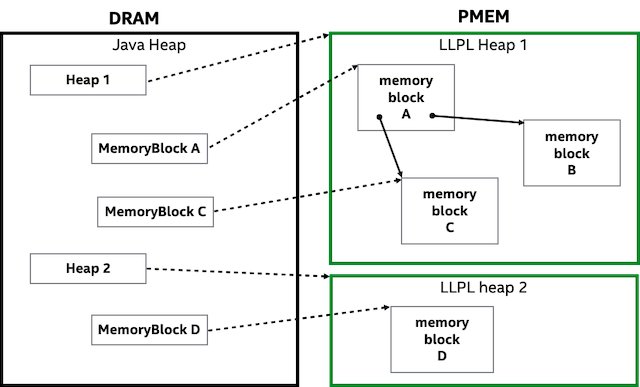
In Figure 1 below, we see Java Heap and MemoryBlock objects being used to access LLPL heaps and memory blocks. At any point in time, these Java access objects are needed only for those heaps and memory blocks that are actively being accessed. When an access object becomes unreachable and is collected by Java, nothing happens to the persistent memory; memory management of LLPL memory blocks is done manually. Likewise, while the Java heap and all its objects disappear when the Java application exits, the LLPL heaps, blocks, and relationships between blocks remain. We’ll see later, in code, that it’s easy to re-access LLPL heaps and their memory blocks when your Java application restarts.
Now we’ll walk through some code examples that demonstrate creating heaps, and reading and writing to blocks of persistent memory.
To create a heap:
   long heapSize = 100 * 1024 * 1024;
   Heap heap = Heap.createHeap("/pmem/heap1", heapSize);
This creates a 100 MB heap with the name “heap1”. The “/pmem/” portion of the heap path is an example of a base path where persistent memory was provisioned on the system. To re-access a heap after a process or machine restart:
Heap heap = Heap.openHeap("/pmem/heap1");
You can delete this heap by deleting the file that names the heap:
>rm /pmem/heap1
Once you have a heap, the next step is to allocate some part of it for writing and reading:
MemoryBlock block1 = heap.allocateMemoryBlock(1024, false);
This returns a memory block object representing a 1K block of zero’d bytes. The memory block API has setter and getter methods for Java byte, short, int, and long types, as well as bulk memory copy methods. For example, to set a long value of 1234 at the first byte in the memory block:
   block1.setLong(0, 1234);
   block1.flush(0, Long.BYTES); // flush data to persistent memory modules
Note the flush call in the second line above. Persistent memory behaves much like regular DRAM, and programming with it is very similar. The obvious difference is its persistence, and the flush above is a necessary operation associated with persistence.
Like DRAM, persistent memory is “cache-coherent virtual memory” and writes to pmem are placed in the CPU cache and made visible to other threads. Like DRAM, however, flushing writes from the CPU cache to the actual memory modules may be delayed until the system needs the cache space. This means that your persistent memory program will behave correctly when initially run, but some of your writes to pmem may not have been pushed all the way to the persistent memory modules prior to your program’s exit. In that case, some changes won’t be present when you reopen the heap to access the “persistent” data. To ensure your changes make it all the way to the memory modules and are available after a restart, a flush operation needs to be done, sometime before your program exits, on those parts of persistent memory that were modified.
We’ll see later how LLPL can flush writes automatically, but full manual control of flushing is available as shown above.
Byte positions within a block are specified using zero-based offsets from the beginning of the block. You can copy bytes between memory blocks, or between a memory block and a Java byte array. For example, to write a length-prefixed string “Saturn” to the first byte in the memory block:
   String s = "Saturn";
   block1.setInt(0, s.length());
   block1.copyFromArray(s.getBytes(), 0, 4, s.length());
   block1.flush(0, Integer.BYTES + s.length()); // flush both writes
After a process exits, the Java objects representing the heap and allocated blocks are discarded, but the persistent memory remains. A way to re-access the memory we were using in the last session is needed, and there are methods in the Heap API that let us do that easily.
To save a “bookmark” to a memory block before our process exits, we can store the name for a memory block, its “handle”, represented as a Java long value, in a special named “root” location in the heap.
heap.setRoot(block1.handle());
To access our heap and our block after a restart:
   Heap heap = Heap.openHeap("/pmem/heap1");
   MemoryBlock block1 = heap.memoryBlockFromHandle(heap.getRoot());
The second line above wraps a memory block object around the supplied handle, giving access again to memory associated with the handle. Memory block handles are stable, and can be safely written as long values into other memory blocks, in order to link blocks and build reference-based data structures:
   MemoryBlock block2 = heap.allocateMemoryBlock(1024, false);
   block1.setLong(100, block2.handle());
   block1.flush(100, Long.BYTES); // flush 8 bytes, handles are Java longs
When you read a handle from one block and want to access the memory associated with the handle you read, you pass the handle to the heap’s memoryBlockFromHandle method to get a memory block back:
   long block2Handle = block1.getLong(100);
   MemoryBlock block2 = heap.memoryBlockFromHandle(block2Handle);
Deallocating a block of memory is done manually by calling its free() method:
block2.free(false);
Since we freed block2, its handle is no longer valid, so we will set the block2 handle we wrote into block1 to zero, an invalid handle value:
   block1.setLong(100, 0);
   block1.flush(100, Long.BYTES);
In the examples so far, we have been writing data and flushing the writes to persistent memory media. Under normal circumstances, this is all that is required to ensure that your data is intact and usable when you restart your application and reopen the heap. However, unforeseen events (e.g. crashes or power failures) can complicate this simple data integrity scheme. For example, if a memory copy operation happens to get interrupted by a crash, only part of the data will have been written to persistent memory, leaving the heap in an inconsistent state. Or, if you are modifying a linked data structure (e.g. writing data to two distinct locations in order to insert a node into a linked list) an interruption can leave your data structure in an un-linked state.
For cases where the consistency of the heap must be maintained in the face of such events, LLPL offers transactional operations and user transactions to provide fail-safe writing to a heap.
The example below writes a length-prefixed string in a fail-safe way, by enclosing the writes in a Transaction and specifying which bytes are modified as part of the transaction.
   String s = "Saturn";
   Transaction.create(heap, () -> {
      block1.addToTransaction(0, Integer.BYTES + s.length());
      block1.setInt(0, s.length());
      block1.copyFromArray(s.getBytes(), 0, 4, s.length());
   });
Note the addToTransaction call above. This tells the transaction about a range of bytes that will be modified as part of the transaction – before they are modified. This allows the transaction implementation to make a backup of those bytes, to be used in restoring the original data in the event that the transaction is interrupted. Written this way, the modifications done as part of the transaction will behave as if they “happen as a whole or not at all.” Flushing of the modifications is done automatically by the transaction if the Java lambda expression (the body of the transaction) executes to completion.
If the application allows multiple threads to concurrently access a byte range being modified in a transaction, then in order to maintain correct transactional behavior, it is important to isolate access to that byte range for the duration of the transaction. For example:
   String s = "Saturn";
   synchronized(block1) {
      Transaction.create(heap, () -> {
         block1.addToTransaction(0, Integer.BYTES + s.length());
         block1.setInt(0, s.length());
         block1.copyFromArray(s.getBytes(), 0, 4, s.length());
      });
   }
In the examples so far, we have been using general Heap and MemoryBlock classes. The MemoryBlock API gives manual control over flushing and adding transaction byte ranges; this gives maximum flexibility, but requires extra coding and care to not forget these important operations. With some loss of flexibility, and possibly some loss of performance, LLPL offers two additional kinds of heaps and corresponding memory blocks that can be used to automate flushing and adding ranges to a transaction.
The PersistentHeap and corresponding PersistentMemoryBlock classes are very similar to the general Heap and MemoryBlock classes, but they automate flushing of writes:
   PersistentHeap heap = PersistentHeap.createHeap("/pmem/heap2", heapSize);
   PersistentMemoryBlock block3 = heap.allocateMemoryBlock(1024, false);
   String s = "Saturn";
   block3.setInt(0, s.length());
   block3.copyFromArray(s.getBytes(), 0, 4, s.length());
   // both writes are flushed automatically
In a similar way, if you want all writes on a heap to be transactional, the TransactionalHeap and corresponding TransactionalMemoryBlock classes automate the adding of all writes to a transaction, both stand-alone writes and writes within an explicit transaction body:
   TransactionalHeap heap = TransactionalHeap.createHeap("/pmem/heap3", heapSize);
   TransactionalMemoryBlock block4 = heap.allocateMemoryBlock(1024);
   String s = "Saturn";
   Transaction.create(heap, () -> {
      // write ranges will automatically be added to the transaction
      block4.setInt(0, s.length());
      block4.copyFromArray(s.getBytes(), 0, 4, s.length());
   });
Offset-based specification of memory locations, as used in the examples above, is very flexible but can be tedious and error-prone. Various techniques can be used to abstract block offsets and hide offset arithmetic. One such technique is to create a Java class whose named accessor methods statically refer to specific offsets within a memory block. For example:
   public class Employee {
      private static long ID = 0;
      private static long NAME_LENGTH = 8;
      private static long NAME_BYTES = 12;
      private TransactionalMemoryBlock block;

      public Employee(TransactionalHeap heap, long id, String name) {
         Transaction.create(heap, () -> {
            block = heap.allocateMemoryBlock(8 + 4 + name.length());
            setId(id);
            setName(name);
         });
      }

      // "reconstruct" an Employee from handle
      public Employee(TransactionalHeap heap, long handle) {
         this.block = heap.memoryBlockFromHandle(handle);
      }

      public long getId() {
         return block.getLong(ID);
      }

      public void setId(long id) {
         block.setLong(ID, id);
      }

      public String getName() {
         int nameLength = block.getInt(NAME_LENGTH);
         byte[] bytes = new byte[nameLength];
         block.copyToArray(NAME_BYTES, bytes, 0, nameLength);
         return new String(bytes);
      }

      public void setName(String name) {
         byte[] bytes = name.getBytes();
         int nameLength = bytes.length;
         block.setInt(NAME_LENGTH, nameLength);
         block.copyFromArray(bytes, 0, NAME_BYTES, nameLength);
      }

      public void free() {
         block.free();
      }

      public long handle() {
         return block.handle();
      }
   }
Using a wrapper object in this way abstracts the allocation, and reading and writing of persistent data into familiar constructor calls and method calls:
   Employee e = new Employee(heap, 12345, "Jupiter");
   long id = e.getId();
   e.setId(23456);
   String name = e.getName();
   e.setName("Pluto");
   e.free();
Note that management of the persistent memory these wrapper objects refer to is still manual. There are more complete code samples in the examples directory in the LLPL GitHub repository at https://github.com/pmem/llpl
I hope that you found this introduction to LLPL interesting, and that you explore LLPL further on GitHub.