Git Workflow
Now that we’ve created the GitHub Repository for the PMDK, here’s a more detailed description of the git workflow we’ve chosen. The basic idea is:
- Current development happens on the
masterbranch - Releases are created periodically by tagging
- After a major release, a
stable-1.xbranch is created. All bug fixes should be committed to the oldest affected branch which is currently supported. Stable branches will be merged periodically to later branches and master. - All changes are done using the common GitHub fork and merge model, where GitHub users fork the repository, make their changes, and submit pull requests.
Here’s a walk-through of the common development workflow, where changes
end up on the master branch.
Using a local feature branch
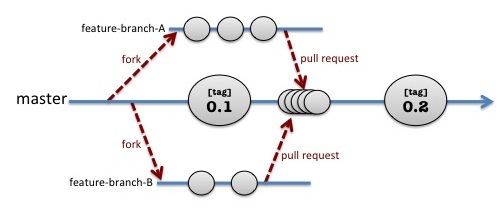
As shown in the above picture, the master branch moves forward in
time, collecting commits (shown as the small circles) and periodically
tagging releases. In the above example, one user has forked the
repo and has created feature-branch-A locally to work on a change.
At the same time, another user has forked the repo to work on
feature-branch-B locally. Forking and creating a local feature
branch are the first steps in development and are done like this:
- Fork the repo using the GitHub web interface
- Create a local clone of your repo and add a remote called
upstreamto point to the original repo:$ git clone git@github.com:username/pmdk.git $ cd pmdk $ git remote add upstream git://github.com/pmem/pmdk.git $ git checkout -b my-feature-branch
Developing and merging locally
Now that you have your local feature branch, do your development with frequent commits recommended. Be sure git is configured with your correct name and email address:
$ git config --global user.name "Firstname Lastname"
$ git config --global user.email "emailaddr@domain.com"
Now you can work on your changes locally, committing them to your local feature branch:
edit files, run tests...
$ git add ...
$ git commit ...
repeat as necessary...
Please follow the common conventions for git commit messages:
- The first line should be 50 characters or shorter and contains a prefix describing the area being changed, followed by a brief description
- The second line is blank
- The remaining lines are 72 characters or shorter and contain English sentences.
- Any references to GitHub issues are at the end of the commit message.
For example, here is a properly-formatted commit message:
doc: fix code formatting in man pages

The indentation in code examples contained in the man pages
was not formatting correctly due to a bug in groff. This
fix avoids the issue by using man2html instead of groff.

Ref: pmem/issues#1
Rebasing
At convenient points in your development, you will want to re-sync with
any changes that have happened in the upstream repo. Do this using
git rebase rather than git merge.
$ git fetch upstream
$ git rebase upstream/master # or upstream/0.1 if patching release 0.1, for example
Before submitting changes
Before asking for your changes to be merged, you are expected to perform these steps at a minimum:
# from top-level of repository...

$ make cstyle
$ make
$ make test
$ cp src/test/testconfig.sh.example src/test/testconfig.sh # edit as necessary
$ make check
We also require all the above to pass using the clang compiler:
$ make clobber
$ make CC=clang CXX=clang++
$ make CC=clang CXX=clang++ test
$ make CC=clang CXX=clang++ check
Please add the appropriate unit tests to verify new features you’ve added.
Please note that the C++ compiler must support the C++11 standard.
Cleaning up your commits
If you’d had a good number of uninteresting commits, such as
those that fix typos or head down a wrong path that you later discarded,
you should consider
squashing those commits into a cleaner set of commits. The command
git rebase -i is a very useful tool for this. For example:
$ git fetch upstream
$ git rebase -i upstream/master
The above rebase command will put you in the editor with a list of all the commits you made on your feature branch. This is a very powerful operation with lots of possibilities – too many to describe here, but a quick remind may help you use it. Say you had four commits but two of them were annoying typo changes that you’d rather just squash away. You’ll see the four commits in the edit like this:
pick 60d3a42 subsystem: this is the first commit message
pick 7c970de subsystem: oops, stupid typo
pick d951f42 subsystem: this is the second commit message
pick dc80ecd subsystem: oops, another stupid typo
Let’s say you want to convert this to two commits, folding the typo fixes into the commits before them. Change the word pick to squash for the commits being squashed – actually, you only need the letter s, like this:
pick 60d3a42 subsystem: this is the first commit message
s 7c970de subsystem: oops, stupid typo
pick d951f42 subsystem: this is the second commit message
s dc80ecd subsystem: oops, another stupid typo
When you write and exit the editor, git will allow you to edit and clean up the commit messages for each set of squashed commits (twice in this example).
Note: if you haven’t used rebase -i before, you should make a copy of your repo before doing this, just in case!
Submitting your change
Now that you’ve your changes are cleanup and fully tested, you’ll want to push them back to your fork of the repo on GitHub:
$ git push origin my-feature-branch
And finally, send the changes back to the original PMDK repository:
- Using the GitHub web interface, navigate to your repo and submit a pull request. This will automatically trigger a Travis Build, so good thing you already made sure your changes build correctly! The PMDK gatekeeper will review your pull request, perhaps comment on it, perhaps accept it. If you find you need to make more changes due to comments, just continue again from the step above where you are editing & committing.
- Watch for comments from the gatekeeper and respond to requests for updates. Although this conversation happens in the pull request managed by GitHub, you are always welcome to ask questions and make suggestions to the entire team using the Google Group.
- After review usually it’s best to squash your commits with fixes the same
way as described above (
git rebase -i). When you try again to push your changes you may encounter git error “failed to push”. In such case it’s required to use “–force” option (git push -f origin ...).