Memory Tiering (part 1)
Extending memory capacity with PMEM
Databases such as Redis (an in-memory key-value open-source database) consume a lot of memory. Since fast access is essential for them, they use DRAM to store their data. DRAM is quite expensive and has limited capacity, so a solution we propose in this blog post is to use PMEM (and in the future other types of memory available through CXL - see a pmem.io blog post about it). PMEM can be used in two modes - Memory Mode and App Direct. In Memory Mode, user sees DRAM and PMEM memory as single, combined memory node. In App Direct mode, when user configures PMEM as KMEM DAX, the PMEM memory will be directly available in the system and visible as a separate NUMA node without a CPU.
Memory tiering - why should I care?
The PMEM in KMEM DAX is available to the application just like regular memory.
When the application allocates data, in the simplest case, the kernel chooses a memory
NUMA node to allocate from in the order determined by the distance between a NUMA node
and the CPU core that made a request (it can be influenced, e.g., by mbind).
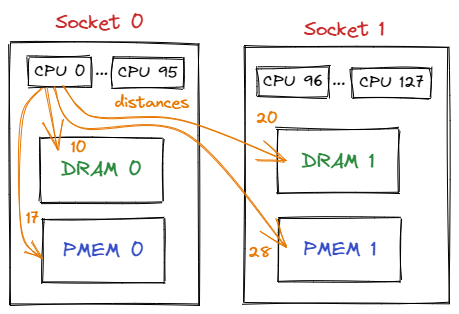
The distances matrix between all NUMA nodes can be determined using the numactl -H command:
Let’s consider an example output from a 4-socket machine:
$ numactl -H

available: 4 nodes (0-3)
node 0 cpus: 0 (...) 95
node 0 size: 257579 MB
node 0 free: 1535 MB
node 1 cpus: 32 (...) 127
node 1 size: 257985 MB
node 1 free: 840 MB
node 2 cpus:
node 2 size: 126976 MB
node 2 free: 126911 MB
node 3 cpus:
node 3 size: 126976 MB
node 3 free: 44294 MB
node distances:
node   0   1   2   3
  0:  10  20  17  28
  1:  20  10  28  17
  2:  17  28  10  28
  3:  28  17  28  10
Assuming the process is on CPU0 and without specifying the target NUMA node, the order of used NUMA nodes will be DRAM 0, PMEM 0, DRAM 1, and finally PMEM 1.
So, if the app wants to consume all memory in the system, it could use all DRAM + PMEM capacity without any code modification or other tricks, but not having control over the allocation destination has its downsides. The two most significant are variable latency of data accesses and unpredictable resource assignment in the multi-app scenario.
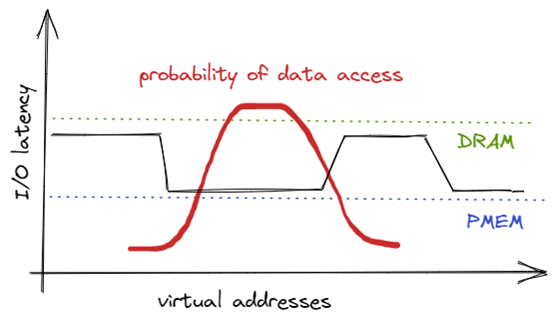
Variable latency of data accesses problem
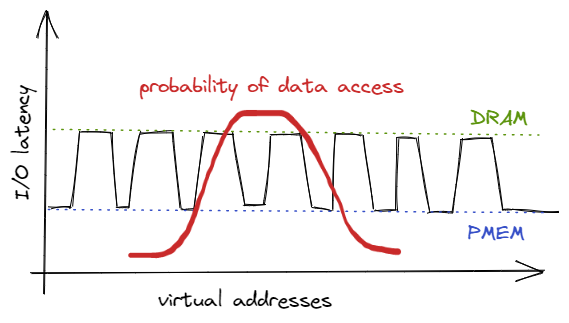
Let’s suppose our application is a simple database: interface, hash map with keys, and data. Typically, in such applications, some of the data are more and some are less frequently accessed, with the distribution being somewhere between normal, Pareto, or Zipf. On the other hand, some of the data may be placed on the memory tier that offers low or high access latency. When these two facts are combined, it may turn out that the kernel has placed the hot data on a low-performance (high-latency) numa node, and the cold data on high-performance (low-latency) one. Which is the opposite of what we want.
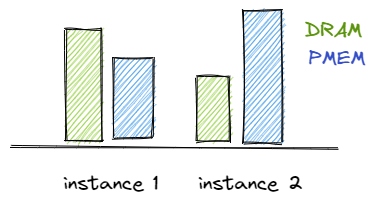
Multi–app problem
When the system is running many applications or more than one instance of a memory-intensive one, and they are executed on CPUs belonging to different sockets, the situation becomes even more complicated. Depending on when the application starts and how often it allocates, it may turn out that the ratio of e.g. DRAM : PMEM for one instance is completely different than for another. Instances with lower than the desired DRAM : PMEM ratio could perform below the required SLA for IOPS or latency requirements.
The solution – memory tiering
Memory tiering is about the distribution of allocations among all (or selected) memory tiers. In this series of blog posts, we will be classifying different types of memory tiering depending on the scale of changes required to apply to an application code:
- explicit tiering (e.g. using libnuma or Memkind API) - where the application is aware of the existence of NUMA nodes with different properties and it fully manages the target NUMA allocation node itself. This is the most powerful and potentially best performing mode,
- explicit auto-tiering (e.g. using Memkind API and memory kinds based on STATIC_RATIO or DYNAMIC_TIERING policy at the same time) - as above, but the application may delegate the management of part of the allocations to the tiering library. The application is also responsible for the proper configuration of the auto-tiering, e.g. defining the number and type of tiers, the target ratio between tiers, and additional properties of the tiering policy,
- explicit binding (e.g. using numactl tool) - the application is bound to a specific NUMA nodes in the system and thus allocations made by the application are only applied to these nodes. Moreover, the numactl tool allows choosing different policies that define what happens when the application runs out of space on the nodes it is bound to. Using explicit bindings, one can partially solve the multi – app problem. What is important, no changes to the application code are needed here,
- transparent tiering (e.g. using autonuma feature in the Linux Kernel, Memkind Transparent Tiering feature, MemVerge Memory Machine) - the application is not aware that it is running on a system with multiple NUMA nodes differing in properties. No change in the application code is required to use such tiering, but the system administrator must set the tiering properties through configuration files or environment variables.
We will describe explicit tiering and, partially, explicit auto-tiering in more detail below.
Explicit tiering
Simple algorithm that keeps targeting DRAM:PMEM ratio
To partially eliminate the problems described above, the user can change the application code to allocate data from different tiers alternately. Additionally, the allocator can count how much data has been placed on each tier and avoid/select those tiers whose occupancy differs from the level defined by the ratio. This way, the user can both control the ratio of memory resource usage and balance the latency of data accesses.
Libnuma library
For those who would like to write an allocator with an explicit tiering feature by themselves, the libnuma library can be very helpful. This library contains various functions for detecting basic properties of NUMA nodes (capacity, free space, and distance between nodes), functions to allocate data on specific NUMA nodes, and much more. This way, the application can identify NUMA nodes with specific properties and decide which data suits best which NUMA node. What is important, functions allocating on specific NUMA nodes are relatively slow compared to their counterparts from the standard glibc library, because they operate on whole pages. More details about the libnuma library could be found here.
Memkind library
The Memkind library allows allocating data directly on different memory tiers in a convenient way using an API similar to glibc’s malloc, supplemented with an additional parameter specifying the target “kind” of memory. Using this parameter, the user can allocate data directly to DRAM, PMEM set in KMEM DAX or FSDAX mode, or HBM. Memkind also offers the more intuitive tiers description like “lowest latency”, “highest capacity” or “highest bandwidth”, which are set to the appropriate NUMA nodes depending on the corresponding parameters of existing NUMA nodes (see this blog post for more info). Notably, Memkind uses a (slightly modified) jemalloc allocator, which offers good performance and low memory fragmentation.
Explicit auto-tiering
We can imagine a situation where a memory-intensive application wants to always keep some data on the medium offering the fastest access but has no requirements for the access speed to the remaining data. The Memkind library is ideally suited for such a scenario. For data requiring access with the lowest latency, the user simply chooses the “lowest latency” memory kind. For the remaining data, one could create its type of auto-tiered kind (using internal API) based on one of the policies offered by Memkind, such as “static ratio” or “dynamic threshold”. Below is an example of how to do that:
#include <memkind.h>
#include <memkind/memkind_memtier.h>
struct memtier_builder *builder =
memtier_builder_new(MEMTIER_POLICY_STATIC_RATIO);
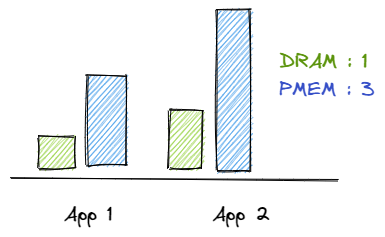
// we want to keep DRAM to PMEM ratio at 1:4 level
memtier_builder_add_tier(builder, MEMKIND_REGULAR, 1);
memtier_builder_add_tier(builder, MEMKIND_DAX_KMEM, 4);
struct memtier_memory *m_tiered_memory =
memtier_builder_construct_memtier_memory(builder);
// allocate from lowest latency memory
void *ptr1 = memkind_malloc(MEMKIND_LOWEST_LATENCY_LOCAL, 32);
// allocate from auto-tiered memory
void *ptr2 = memtier_malloc(m_tiered_memory, 1024);
Summary
We have presented both the benefits and potential challenges of using PMEM as a DRAM extension. However, the biggest drawback of explicit tiering is the need to modify the application code. Therefore, in further blog notes, we will describe some “transparent tiering” techniques and take a closer look at the auto-tiering algorithms implemented in the Memkind library.