How to emulate Persistent Memory
Data allocated with PMDK is put to the virtual memory address space, and concrete ranges are relying on result of mmap(2) operation performed on the user defined files.
Such files can exist on any storage media, however data consistency assurance embedded within PMDK requires frequent synchronisation of data that is being modified.
Depending on platform capabilities, and underlying device where the files are, a different set of commands is used to facilitate synchronisation.
It might be msync(2) for the regular hard drives, or combination of cache flushing instructions followed by memory fence instruction for the real persistent memory.
Although application adaptation to PMDK usage, and ability to operate on persistent memory might be done by relying on regular hard drive, it is not recommended due to the performance hit coming from msync(2) operation.
That is the reason to work either with the real equipment or emulated environment. Since persistent memory is not yet commonly available we do recommend setting up emulation system, that will speed up development, and testing of the application you are converting. In the following steps we shall cover how to setup such system.
Hardware and system requirements
Emulation environment is available at the current stage only for Linux systems, and should work on any hardware or virtualized environment. Emulation of persistent memory is based on DRAM memory, that is seen by OS as Persistent Memory region. Due to being a DRAM based emulation it is very fast, but will likely loose all the data upon powering down the machine. It should as well work with any distribution able to handle official kernel.
Linux Kernel
Download kernel sources from official kernel pages.
Support for persistent memory devices and emulation is present in Kernel since 4.0 version, however it is recommended to use Kernel newer then 4.2 due to easier configuration of it. Following instruction relies on 4.2 or newer. Using Kernel older then 4.2 will require a bit more work to setup, and will not be described here.
Please note, that features and bug fixes around DAX support are being implemented as we speak, therefore it is recommended to use the newest stable Kernel if possible.
To configure proper driver installation run nconfig and enable driver.
$ make nconfig
Device Drivers --->
{_} NVDIMM (Non-Volatile Memory Device) Support --->
<M> PMEM: Persistent memory block device support
<M> BLK: Block data window (aperture) device support
[_] BTT: Block Translation Table (atomic sector updates)
[*] PFN: Map persistent (device) memory
Additionally you need to enable treatment of memory marked using the non-standard e820 type of 12 as used by the Intel Sandy Bridge-EP reference BIOS as protected memory. The kernel will offer these regions to the ‘pmem’ driver so they can be used for persistent storage.
$ make nconfig
Processor type and features --->
[*] Support non-standard NVDIMMs and ADR protected memory
[*] Device memory (pmem, etc...) hotplug support
File systems --->
[*] Direct Access (DAX) support
You are ready to build your Kernel
$ make -jX
where X is the number of cores on the machine
Install the kernel
# sudo make modules_install install
Reserve memory region so it appears to be a persistent memory by modifying Kernel command line parameters. Region of memory to be used, from ss to ss+nn. [KMG] refers to kilo, mega, giga.
memmap=nn[KMG]!ss[KMG]
E.g. memmap=4G!12G reserves 4GB of memory between 12th and 16th GB.
Configuration is done within GRUB, and varies between Linux distributions.
Here are two examples of GRUB configuration.
Ubuntu Server 15.04
# sudo vi /etc/default/grub

GRUB_CMDLINE_LINUX="memmap=nn[KMG]!ss[KMG]"

# sudo update-grub2
CentOS 7.0
# sudo vi /etc/default/grub

GRUB_CMDLINE_LINUX="memmap=nn[KMG]!ss[KMG]"
On BIOS-based machines:

# sudo grub2-mkconfig -o /boot/grub2/grub.cfg

On UEFI-based machines:

# sudo grub2-mkconfig -o /boot/efi/EFI/centos/grub.cfg
After machine reboot you should be able to see the emulated device as /dev/pmem0. Please be aware of the memory ranges available to your OS, and try not to overlap with those. Trying to get reserved memory regions for persistent memory emulation will result in split memory ranges defining persistent (type 12) regions. General recommendation would be to either use memory from 4GB+ range (memmap=nnG!4G) or checking upfront e820 memory map and fitting within.
If you don’t see the device, verify the memmap setting correctness, followed by dmesg(1) analysis. You should be able to see reserved ranges as shown on the dmesg output snapshot:
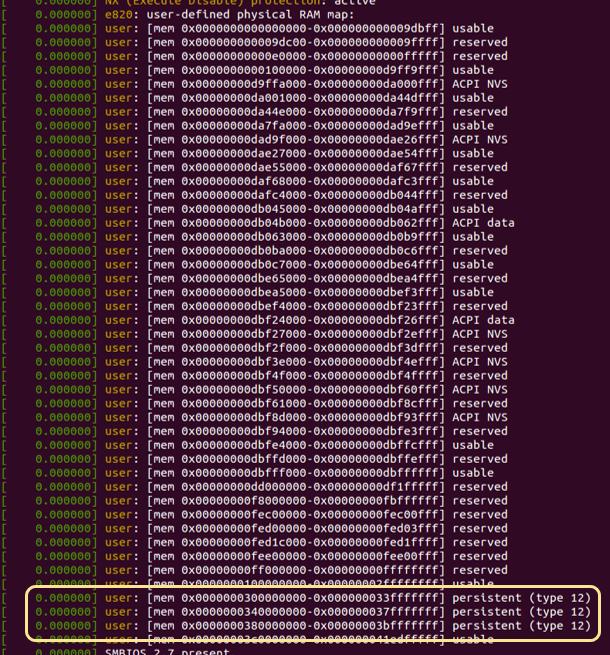
You can see that there can be multiple non-overlapping regions reserved as a persistent memory. Putting multiple memmap="...!..." entries will result in multiple devices exposed by the kernel, and visible as /dev/pmem0, /dev/pmem1, /dev/pmem2, …
DAX - Direct Access
The DAX (direct access) extensions to the filesystem creates PM-aware environment.
Having filesystem brings easy and reliable rights management, while with DAX add-on, any file that is memory mapped with mmap(2) is directly mapped from physical address range into process virtual memory addresses.
For those files there is no paging, and load/store operations provide direct access to persistent memory.
Install filesystem with DAX (available today for ext4 and xfs):
# sudo mkdir /mnt/mem

### sudo mkfs.ext4 /dev/pmem0 OR #sudo mkfs.xfs -m reflink=0 /dev/pmem0

### sudo mount -o dax /dev/pmem0 /mnt/mem
Now files can be created on the freshly mounted partition, and given as an input to PMDK pools.
It is additionally worth mentioning you can emulate persistent memory with ramdisk (i.e. /dev/shm), or force pmem-like behavior by setting environment variable PMEM_IS_PMEM_FORCE=1, that would eliminate performance hit caused by msync(2).